If you work with process fluids—whether in pharmaceuticals, oil and gas, food and beverage, or chemical manufacturing—you know how critical a reliable viscosity reading is to keep production on track and product quality consistent. As a supplier of tuning fork viscometers, I get asked this question at least once a week: “How do I clean my tuning fork viscometer correctly without damaging it or throwing off its readings?” Tuning Fork Viscometer

It makes total sense: these instruments are precision tools. Their core operating part is a small, calibrated tuning fork that vibrates at a specific frequency, and the fluid surrounding it changes that frequency based on the fluid’s viscosity and density. Even a tiny layer of dried residue, cross-contaminated fluid, or buildup of particulates can skew that frequency, leading to inaccurate data, rejected batches, or unnecessary downtime. Over the years, I’ve walked dozens of operators, lab technicians, and maintenance teams through this process, and I’ve seen what works, what wastes time, and what can actually ruin a perfectly good viscometer. Today, I’m breaking this down step by step, from pre-cleaning prep to post-cleaning validation, so you can keep your tuning fork viscometer running like the day it was installed.
First, let’s start with the basics: when do you need to clean your tuning fork viscometer? It’s not a one-size-fits-all schedule, and cleaning too often is just as bad as cleaning too rarely. General rules of thumb: if you’re working with a new, highly viscous fluid, or a fluid that’s prone to drying, cross-contamination, or leaving residue (like latex, heavy oils, or biological samples), clean it every batch or at maximum every 24 hours. If you’re running consistent, low-viscosity fluids with minimal particulates, you can stretch it to every 7 to 10 batches, but it’s always a good idea to log cleaning dates alongside viscosity readings—this will help you spot patterns, like a spike in viscosity measurements that lines up with a skipped cleaning. If you ever notice readings drifting from your baseline (or from a reference lab viscometer), that’s your first sign to stop what you’re doing and inspect your tuning fork.
Now, before you even grab a cloth or solvent, stop and do three key things. First, turn off and disconnect the viscometer from the power source and process line. For inline viscometers, this might mean shutting off a valve to isolate the sensor, or lifting the sensor out of a batch tank (always follow your manufacturer’s lockout/tagout procedure—safety first, every time). Second, inspect the tuning fork for immediate, obvious damage: look for chips, scratches, bent prongs, or any caked-on material that won’t rub off easily. If the prongs are bent, don’t attempt to clean it—send it back to us or a certified repair technician, because even a tiny bend will throw off the vibration frequency permanently. Third, identify the fluid you were working with, and use that to pick the right cleaning supplies. This is where I see a lot of people make mistakes: using a harsh solvent on a delicate coating, or a abrasive cleaner that scratches the tuning fork’s surface.
Let’s categorize this by the type of process, because cleaning a lab benchtop tuning fork viscometer is different from an inline industrial unit, and cleaning for biological residues is different from removing heavy mineral oils. We’ll start with the most common scenarios, since that’s what our customers deal with day to day.
First: Lab Benchtop Tuning Fork Viscometers (for low-volume samples, research, or small-batch manufacturing). These are smaller, often have the tuning fork housed in a removable, glass or metal probe, and are gentler than inline units. For routine cleaning between samples: after disposing of your test fluid, rinse the tuning fork and probe immediately with the same solvent you used for the test (e.g., ethanol for biological samples, hexane for oils, deionized water for aqueous solutions). Do not let the fluid dry on—dried residue is way harder to remove, and it can seep into the tiny gaps between the tuning fork prongs. Once you’ve rinsed off all visible fluid, use a soft, lint-free microfiber cloth (never paper towels—they leave tiny cellulose fibers that get stuck in the prongs) and gently wipe the surface of the tuning fork and probe. For any small spots that won’t come off with a rinse, you can dip a cotton swab (the kind with a pointed tip, not a fluffy one) in a small amount of solvent, and very carefully swab the area between the prongs. Never scrub or apply pressure to the prongs—they’re calibrated to within thousandths of a millimeter, and even a light scrub can damage their surface. Once you’ve done that, rinse the tuning fork again with deionized water (if you used an organic solvent) to remove any leftover solvent, then dry it with a clean microfiber cloth. For lab units, we also recommend a deep clean once a week: soak the tuning fork in an appropriate cleaning solution (like a 10% solution of mild lab detergent in deionized water for aqueous samples, or isopropyl alcohol for organic) for 15 to 20 minutes, then gently agitate it (very gently—don’t shake it) to loosen any remaining particulates, rinse, and dry.
Next: Inline Industrial Tuning Fork Viscometers (the ones installed in pipes, tanks, or processing lines for continuous monitoring). These are built to handle harsh conditions, but they’re still precision instruments, so rough cleaning can still cause damage. For routine cleaning, the simplest method is hot flushing. Most process lines have a clean-in-place (CIP) system, and if your tuning fork viscometer is compatible with CIP, that’s the easiest, most consistent way. The key here is to make sure the hot flushing fluid matches the fluid your system uses for CIP—for example, if your CIP uses sodium hydroxide for biological processing, or citric acid for food and beverage, make sure it’s at the correct concentration and temperature (usually between 60°C and 80°C, but check your unit’s manual, because some lower-temperature models can’t handle high heat). Run the CIP fluid through the line for 10 to 15 minutes, which will wash away any loose residue. For buildup that’s stuck, you’ll need to do a manual clean after isolating the sensor. Turn off the process line, remove the sensor housing, and lift the tuning fork assembly out (follow the instructions specific to your model—never force it). Once the tuning fork is accessible, use a soft-bristled nylon brush (never metal bristles—they scratch the surface) and gently brush the surface of the prongs, being careful not to bend them. For material stuck between the prongs, use a plastic dental pick (again, not metal) to carefully dislodge it, then rinse with your CIP solution. Avoid using high-pressure water or air here—high pressure can push residue into tiny gaps, or even bend the prongs. After cleaning, you can also perform a air dry with low-pressure, oil-free air, and then reassemble the sensor. For industrial units that process food, pharmaceuticals, or other regulated materials, we always recommend following 3-A or FDA guidelines for cleaning, and documenting each step—this helps with audits, and it’s standard practice for our regulated customers.
Now, what about tricky, stubborn residue? Things like cured adhesives, hardened latex, heavy waxes, or crystallized salts. These require a bit more care, and this is where I see the most mistakes. First, never use abrasive cleaners—steel wool, scouring pads, or abrasive sponges will scratch the tuning fork’s surface, and even a tiny scratch can change the vibration pattern, leading to wrong viscosity readings. If you need to remove a stubborn buildup, use a solvent that’s specifically formulated for that residue, and test a small, hidden area of the tuning fork first to make sure it doesn’t damage any protective coatings (many modern tuning forks have a PTFE or ceramic coating for chemical resistance, and some solvents can degrade that coating). For example, if you’re working with cured epoxy, use a solvent like methyl ethyl ketone (MEK) or acetone, apply a small amount to a soft cloth, and let it sit on the residue for 30 to 60 seconds to soften it, then gently wipe it away. For crystallized salts, use warm deionized water with a mild, non-abrasive detergent, soak the tuning fork for 20 minutes, then gently scrub with a nylon brush. For heavy waxes, use hot mineral oil or a wax-specific solvent, rinse thoroughly, and then wash with a mild detergent to remove any leftover oil. No matter what solvent you use, make sure you fully rinse the tuning fork to remove all traces of the solvent before putting it back into service—leftover solvent can mix with your process fluid and contaminate batches.
Wait—what should you never do when cleaning a tuning fork viscometer? Let’s list these out, because they’re common, and they can cost you a new sensor. First: never immerse the entire viscometer unit (only the sensor probe/tuning fork assembly—electronics are not water or solvent resistant). Second: never use metal tools, metal brushes, or abrasive materials on the prongs. Third: never apply excessive pressure when wiping or cleaning the prongs—they’re thin, and even a light twist can bend them. Fourth: never use compressed air to blow residue off the prongs at high pressure—this can bend prongs or push residue into hard-to-reach areas. Fifth: never skip the drying step—moisture left on the prongs can cause corrosion (especially if your process fluid is corrosive) or leave water residue that skews readings.
Once you’ve finished cleaning, the next step is to validate that you did it right, because cleaning isn’t done until you confirm the readings are back to baseline. There are two easy ways to do this. The first is to run a standard reference fluid through the viscometer and compare the reading to the known viscosity of that fluid (you can get NIST-traceable reference fluids from any lab supplier, and we often recommend these to our customers). For example, if your viscometer’s baseline for a 10 mPa·s reference fluid is 9.9 to 10.1 mPa·s, and after cleaning it reads 9.8 to 10.2, you’re good to go. If it’s outside that range, you probably missed a small bit of residue, or you damaged a prong—so do a more thorough clean, or inspect the prongs for damage. The second validation step is to run a quick test with your process fluid before putting it back into full production. If your viscosity readings match the readings you had before the previous batch, that’s a good sign. If they’re drifting, double-check your cleaning process—you might need a different solvent, or a longer clean time.
Over the years, I’ve had customers tell me they skip cleaning to save time, only to end up with a week of downtime because their viscometer failed, or a batch of product had to be scrapped because of bad viscosity readings. On the flip side, I’ve had customers who over-cleaned, using harsh solvents that degraded their sensor’s coating, leading to faster buildup and more frequent repairs. The sweet spot is a consistent, gentle cleaning routine tailored to your specific process fluid and viscometer model.
If you’re dealing with a tuning fork viscometer that’s giving you trouble—whether it’s inaccurate readings, residue buildup, or you’re not sure if you’re cleaning it correctly—we’re here to help. We work with customers across every industry, from small lab operations to large industrial processing plants, so we can help you create a custom cleaning schedule that fits your needs, answer any questions about compatible solvents, and even offer routine maintenance services to keep your viscometer running smoothly. We also provide detailed guides specific to our models, including parts of the viscometer that are easy to miss when cleaning and how to spot subtle damage before it causes downtime.
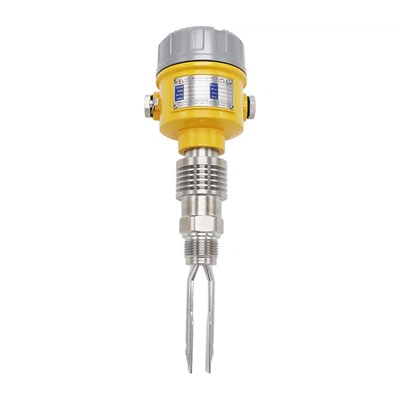
Whether you’re dealing with a new batch of biological samples, heavy crude oil, or food and beverage products, a well-cleaned tuning fork viscometer is non-negotiable for consistent quality and efficient production. Don’t let preventable cleaning mistakes cost you time or money. If you’re ready to optimize your viscometer maintenance, or you’re in the market for a reliable tuning fork viscometer that’s built for easy cleaning, reach out to our team to discuss your needs and find the right solution for your operation.
RF Admittance Switch References
- ASTM International. (2020). Standard Test Method for Viscosity Determination by Vibrating Element Viscometers. ASTM D7042-20.
- Endress+Hauser. (2022). Tuning Fork Viscometer Operation and Maintenance Manual.
- Food and Drug Administration (FDA). (2019). Sanitation Standard Operating Procedures (SSOPs) for Food and Beverage Processing Equipment.
- International Society of Automation (ISA). (2021). Guide for Process Viscometer Calibration and Maintenance. ISA-TR96.00.02.
Shandong Aipuxin Automation Instrument Co., Ltd.
Shandong Aipuxin Automation Instrument Co., Ltd. is one of the most professional tuning fork viscometer manufacturers and suppliers in China, specialized in providing high quality customized service. We warmly welcome you to wholesale cheap tuning fork viscometer in stock here from our factory. For price consultation, contact us.
Address: Huigu Phase 1, Zhongnan High-tech Canal New City, Rencheng District, Jining City, Shandong Province
E-mail: aipuxin0124@gmail.com
WebSite: https://www.aipxin.com/
